PACKING 101:
So you decided to pack your belongings yourself? Consider the time and effort necessary to properly protect your belongings. In most cases you can save money by doing your own packing, however I strongly recommended that you let a Connecticut mover pack any fragile or valuable items. When you use a Connecticut mover, you have the option of doing some or all of the packing yourself, or you can leave it to the experts. Discuss the options available to you with your Connecticut movers.
For the next couple of days, I will be giving you some tips and lessons on how to properly and safely pack your goods. Good packing is an essential key to having a great Local move. It is especially important that you be familiar with the techniques and boxes that will best protect your possessions. Here are a few things to remember if you have chosen to pack your own goods:
You want to have everything packed and ready for loading when the local movers arrive. Your Connecticut mover has the right to inspect packed-by-owner(PBO) items to ensure they are sufficiently packed to protect your goods. If your Connecticut mover thinks a container is not packed properly or safely, the local mover may ask you to repack it. The local mover may also offer to repack the container for you. Keep in mind though, your Connecticut mover will charge you for this service. Upon delivery of your goods, report any damage to PBO containers immediately. If you fail to do so, almost all Connecticut movers will deny any claim on goods packed by yourself
When looking for materials and boxes, use only strong, corrugated cartons with tops or flaps that fold shut. Purchasing new, high quality packing materials specifically designed for moving can really make the difference in making sure that your household goods arrive at their destination safely. Moving boxes come in a variety of shapes and sizes that are specifically suited to fit a variety of household goods. Check with your Connecticut mover for prices on their materials. You can sometimes get used moving boxes from your Connecticut mover at half the price, though for your dishes, I do not reccomend used boxes.
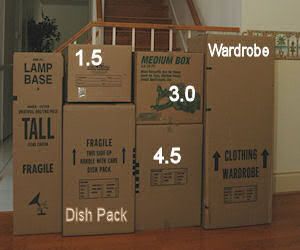
What Type Of Packing Supplies Are You Going to Need?
Dish Packs (also referred to as a dish barrel or a dish box)
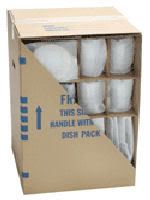 A special box used to pack dishes or any other type of fragile goods. The box is usually double corrugated for more protection and can some times come with inserts for glasses or plates.
Small Boxes (1.5 box)
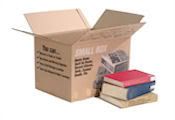 This box is used primarily for books, allowing them to be filled completely and still easy to handle. You can also use this box for miscellaneous small items.
Medium Boxes (3.0 box)
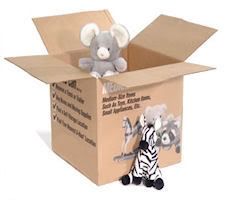 Medium boxes are primarily considered to be used as the catch all box. It is strong enough to handle most things and can typically be filled to the brim and still handled pretty easy.
Large Boxes (4.5 box)
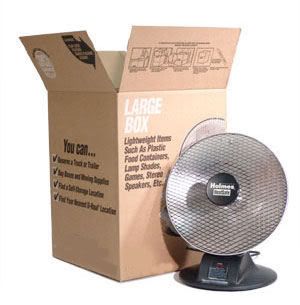 Consider this size box to be used for linens, sweaters, small appliances, etc.
Wardrobe Box
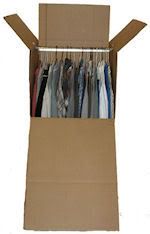 Boxes used primarily for hanging clothes. Also, It is not uncommon for local movers and shippers alike to fill the bottom of the box with shoes or other foldable garments.
Mirror/Picture Carton
 Protects pictures, mirrors and artwork. Though you can use separate pieces to protect the glass on cabinets and entertainment centers.
News Print
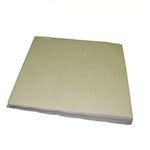 Just another word for paper. It is the same thing as newspaper except there is no print on it. News Print is wrapped around fragile items before being packed in boxes to protect from damage.
Getting Started
Pack one room at a time. This will help in preventing you from becoming confused or overwhelmed.
Start with packing things that you do not use or can live with out. Do not pack items that you will need until the day of your move. Before packing cartons, you’ll need to wrap most items to protect them from scratching or breaking. You can use old newspapers, but you want to be careful— the ink may rub off and stain certain items, especially china and glasses. I recommend that you use unprinted news print. This is the same type of news print that most local movers will use. You should be able to purchase this paper directly from your Connecticut movers!
Start by placing a small stack of paper on a flat, uncluttered table or counter top. Round glasses and jars can be rolled up in two or three sheets of paper; always begin from a corner of the sheet and fold the sides in as you roll. Large or odd-shaped items require a similar technique. Place them in the center of the sheet and bring the corners together. It may be necessary to flip the item over and wrap it again from the other side. If in doubt, use more paper! When the corners are brought together, secure them with tape.
Before packing each box, line the bottom with a few inches of wadded paper for padding. Then place large, heavy items on the bottom and lighter, more fragile items on the top. Plates, books and things of a similar shape, should be loaded vertically to utilize their own maximum structural strength.
DO NOT overload your boxes; keep them to a manageable weight no more than 50lbs. Fill in any voids with wadded paper and also top off your boxes with a few inches of wadded paper. Then tape cartons securely to avoid shifting during transportation.
I highly recommend that you do not use masking tape or duck tape on your boxes. Masking tape is never strong enough for full boxes and will break. Duck tape does not stick very well and when it does stick it is very hard to get open. The most effective packing tape is poly-vinyl chloride or PVC. You can purchase this tape from your Connecticut mover.
Empty all your drawers of breakables, liquids, non-transportable items and anything that would puncture or damage other items.
Pack similar items together. For example, do not pack your china in the same box with pots and pans. Keep all parts or pairs of things together. For example, curtain rod hangers, mirror bolts and other small hardware items should be placed in plastic bags and taped or tied securely to the article to which they belong.
Roll up all electrical cords and secure them so they do not dangle.
Pack small, fragile, individually wrapped items separately or a few together in small boxes, padding them with paper. Place small boxes in a single large box, filling in spaces with paper.
As you finish with each box, put the name or the room it belongs to and the contents on the side of the box (for easy viewing while stacked). Make sure you indicate “FRAGILE” on on any breakables and “THIS END UP” where appropriate. I recommend that you place a sign on the door of each room at destination corresponding to the box labels, so the local movers can place the boxes into the proper rooms quickly.
Never pack flammable items or non-allowable items. (For example: chemicals, propane tanks, pesticides, etc…)
Make sure to pack high value items carefully. (For example jewelry, stamp collections, coin collections, etc.) I also recommend that you transport these items yourself, however, if that is not possible make sure you register these items with your Connecticut mover so they can pay special attention to these items.
PACKING 102:
I thought I’d give some more packing details that will only help you pack your belongings carefully. Whether you plan on moving these items yourself – or having a Connecticut mover – like All My Sons of Connecticut move your family – these tips will help you!
Now that you know you are relocating you can begin packing your kitchen first. Start with your rarely used serving dishes, seasonal items and minor appliances. Make sure you check all your cabinets and the dishwasher to make sure you have gotten everything.
Next, pack your large serving bowls and any specialty pots or pans. I recommend that you buy some disposable plates, cups, and utensils for those last couple of days in your home. The last thing you are going to pack in your kitchen is your food and any cleaning items. Below is some tips on how to pack certain things from your kitchen:
Dishes and China
Select a medium-sized carton (or a dish pack provided by your local mover) and line the bottom of the carton with 2 -3 inches of packing paper for cushioning.
Have your packing paper stacked neatly either on a table or on the counter top, center one plate on the paper.
Grasp a corner of several sheets and pull the paper over the plate until the plate is completely covered.
Stack a second plate on the first and grasp another corner of several sheets and pull them over the second plate.
Stack a third plate. Grasp the remaining two corners and fold using two sheets, one corner at a time over the plate.
Turn the wrapped stack of plates upside down onto your paper. Re-wrap the entire bundle with a couple more sheets. Starting with one corner of packing paper and pulling the sheets over the bundle, cover the bundle with the next corner, then the third corner; and finally the fourth. Seal the bundle with packing tape. Packing tape can be bought from your local mover.
Place the bundle of plates in the box (or dish pack) so that the plates are standing on edge. This will allow you to utilize their maximum structural strength. Surround each bundle with crushed paper, being careful to leave no voids or unfilled spaces.
Add 2 – 3 inches of crushed paper on top of the bundle to protect rims and make a level base for the next layer.
Smaller plates, saucers and shallow bowls should make up a second layer.
Larger china and glass plates, platters and other flat pieces are excellent as the lowest layer in a dish pack.
Once you have finished filling the box add 2 – 3 inches of crushed paper on top and seal the top with tape.
I always recommend that you pack your delicate china and glassware in dish packs which you can purchase from your local mover. These boxes are specifically designed for your dishes and are double corrugated for more protection. Make sure you label these boxes “Fragile – or This Side Up”.
Glasses / Cups / Stemware
Before wrapping any of the glasses, cups or stemware, fill the inside of the glass or cup with crushed paper.
Lay the glass, cup or stemware on the corner of your packing paper and roll it one or two full rotations (depending on size).
Pull the two side corners of the paper up and over the glass one at a time and tuck the corners inside the top of the glass, cup, or stemware and continue rolling to the far corner.
Place cups in a vertical position, lips down (Not on their sides) near the top of the box. Do not stack heavy items on top of the cups.
Remember, as you pack each layer of a box, use crushed packing paper to assure a snug fit wherever there is a gap. All boxes that contain fragile items should be marked Fragile.
Bowls and Odd-shaped Items
Depending on their weight, these might be used for either the bottom or middle layers.
Wrap the same way as flat plates. Stand shallow bowls (soup plates, etc.) on edge in the moving carton and deeper ones (such as mixing bowls) can be placed two or three together, upside down and on their rims.
Wrap sugar-bowl lids in newsprint, turning them upside down on top of bowls. Then wrap both together in newsprint, followed by a double outer layer.
Wrap sauce containers, gravy boats and similar pieces in newsprint and then a double outer wrapping.
Place all these items upright in the moving carton and then layer with 2 – 3 inches of wadded newsprint to protect the items and also to make a level base for the next layer
Flatware / Silverware
Loose flatware should be wrapped individually or in sets, in paper, clear plastic bags, or in small boxes that are then secured with tape.
Remember, air causes silver to tarnish so make sure all silver pieces are enclosed completely in clean newsprint and then placed in plastic bags or plastic wrap.
If you have silverware that is in a chest, consider wrapping each piece individually and repositioning them in the chest, or fill all voids in the chest with newsprint to prevent shifting while moving. The chest can then be wrapped in a blanket when the movers come to prevent any damages to the chest.
If you are traveling long distance or if your goods are going into storage for a long period of time I recommend that you wrap each piece in cloth or low-sulfur-content paper(ask your local mover) to prevent tarnishing over time.
Small Appliances
Use the original manufacturer’s carton if available; if it is not available, follow instructions below.
Remove any loose items from inside any appliances like microwave ovens, such as cookware, glass shelves or carousels.
Wrap loose articles and place in a separate container.
Each appliance needs to be wrapped individually.
Tape any doors or movable objects shut.
Place tape in an “X”-pattern to protect any glass on the doors.
If their cords disconnect, wrap them in plastic and secure them to the appliance they belong to. Place the items in a sturdy medium sized box cushioned with crushed paper with the heavier items in the bottom. Have an authorized serviceman prepare all large appliances (refrigerator, stove, freezer, washer, dryer, etc.) for moving. * Be sure to prepare major appliances (defrosting them, cleaning them and drying them as needed) before your local movers arrive.
Food Items
Do not take anything perishable. In other words either use or donate all your perishables before your local move. Small containers of herbs and spices, condiments, bouillon cubes, gelatin, flavorings, etc. should be placed together in a small box before packing in a larger carton. Cover holes of shaker-type containers and seal with tape.
Open boxes of dried or powdered foods such as rice, macaroni and cereals should be sealed with tape. Dispose of any open packages and or opened glass jars to prevent breakage or spillage during your local move. Do not risk moving food products during the summer. The inside of a moving van (especially in Florida, Nevada & Arizona) can reach 155 degrees causing food to either spoil or explode. In the winter months, do not take anything subject to freezing. Canned goods and other non-frozen foods should be packed upright in small boxes (1.5 cu. ft. book boxes) with no more than 24 to 30 cans per carton.
PACKING 103:
Artificial Flowers
1) An arrangement of artificial flowers should be packed in its own carton.
2) Wrap the arrangement/flowers carefully in plastic wrap, tissue paper or paper towels.
3) Make sure you fasten the base of the floral arrangement to the bottom of the carton.
4) Do not forget to label the carton “FRAGILE” & “THIS SIDE UP.”
Lamp Shades & Bases
1) Remove bulbs, harps and shades and set aside.
2) Make sure you handle lampshades by their wire frames only.
3) Carefully wrap each shade in three or four sheets of newsprint or tissue paper.
4) Shades can be nested inside each other, as long as they are separated by paper.
5) Use a sturdy box at least two inches larger all around than the largest shade.
6) Line your box with clean paper, using crushed paper under the lamp shade to create a protective layer, but not around the shade.
7) Wrap harp and finial (decorative knob) with packing paper and tape to the inside wall of the carton that contains the shade.
8) Label cartons “LAMP SHADES” & “FRAGILE.”
9) Wrap the base, harp and bulb separately in newsprint.
10) Place them together in a carton, filling spaces with crushed paper.
11) More than one well-cushioned lamp may be packed in a carton.
12) Label cartons “LAMP BASES” & “FRAGILE.”
Computers, Stereos and other electronics
If possible, pack electronics in their original cartons. As long as proper packing materials are used electronics can be safely packed in sturdy boxes. Refer to the manufactures’ guide or user’s guide for special moving instructions. If you no longer have a user’s guide, visit the manufacturer’s website for an online version or to request a copy.
1) Before disconnecting any wires or plugs, mark the wire or cable and the port you’re removing it from with the colored labels. Color code the ports and cables so you can reconnect them later. If you run out of different colors, you can also write a number on the label that will match the port and the cable.
2) For extra protection, write down detailed step-by-step instructions on how you’re dismantling the equipment so you can refer to it later when assembling it. Keep this instruction guide in the box with the equipment.
3)Place the cables and wires into a sealable bag (i.e. ziplock baggies) and tape it to the piece of equipment.
4) Remove all parts that can be disconnected and wrap each piece with 3 – 4 sheets of paper.
5) Pad the bottom of the box with a generous amount of newsprint.
6) Place the largest piece of equipment on the bottom and fill holes with additional paper.
7) Place smaller protected items on top.
3) Fill all remaining spaces with paper, making sure nothing rattles or that nothing will shift during the move.
4) Firmly seal the carton.
5) Label each box with the contents and which room it belongs in and also label each box as “FRAGILE” & “THIS END UP.”
Note: When you unpack your electronics, let them reach room temperature before plugging them in. Also, CD’s and software can not tolerate high temperatures. If you have sensitive media, you may want to carry it with you as opposed to moving it on the local movers truck.
Live Plants
If you are fond of your plants it is wise to put some time and effort into making the moving process as quick and painless for them as possible. Almost all moving companies will NOT cover plants. They are just too easy to damage. So take extra care yourself. You also need to bear in mind that certain movers will not carry plants or may have restrictions on those they carry according to your destination. You can move a plant successfully from one house to the next only to see it wither and die a couple of weeks later. To avoid this you need to do some preparations well ahead of your move to get them in peak condition.
1) Get some sturdy boxes & line these boxes with plastic so that they are ready for your moving day.
2) Inspect all the plants you want to transport a couple of weeks before you move and prune them, feed them and administer any pest control treatments to get them into peak condition.
3) Think about the pots they’re in. I recommend that you re-pot the plants into plastic pots.
4) Check that all your pots are whole and not cracked or broken. A cracked pot stands more chance of breaking in transit and thus damaging the contents.
5) Ensure that the pots are not too big for the actual plant. This can cause them to move about and damage themselves.
6) On your moving day (or the day before if you’re pushed for time) make sure that none of the plants are water-logged and drain away any excess water.
7) Pack them snugly (but not too tightly) into the boxes you have set aside and put some packing paper around the pot hold them firmly.
8) Tell your movers that these boxes contain plants.
9) Plants in large pots should be wrapped in plastic or placed in bags. You can also wrap the actual plant in plastic to avoid damage and to keep the plant together. If you do this be careful to make sure that the plastic is not tied together too tightly, plants still need to breathe!
10) If you’re moving garden plants the best time to dig them up is on your moving day. This minimizes disruption.
11) You should dig up the plant so that you have a ‘root ball’ at the base. Wrap this in plastic and make sure that the earth in it is not too dry.
12) At delivery take your plants out of their boxes and any wrappings as soon as you can.
13) Garden plants need to be put in the garden as soon as possible. Keep in mind you can always move them later.
14) Keep an eye on both house and garden plants for a few weeks after the move and make sure they are well watered and fed as necessary. Your garden plants may be transplanted into soil that is different to that they are used to and they may need extra help and attention.
Firearms
1) You are responsible for transporting handguns and ammunition.
2) Other firearms such as rifles or shotguns must be unloaded.
3) Get a specific inventory of these items from your local mover and make sure your driver includes the serial numbers on the inventory.
I hope that the tips that I have provided you will help make your move easier.
Packing 101
Packing 102
Packing 103